Sunday, October 08, 2006

Star 45 Construction Planking with edge glueing

[Star45] Update on planking bottom with edge glueing.

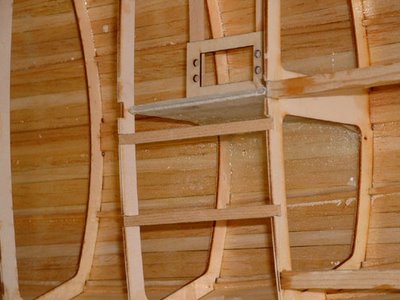
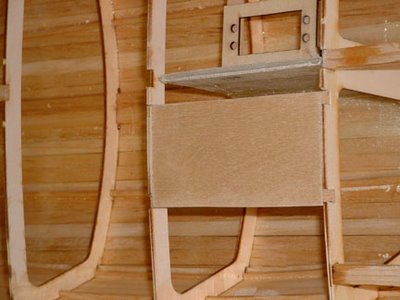
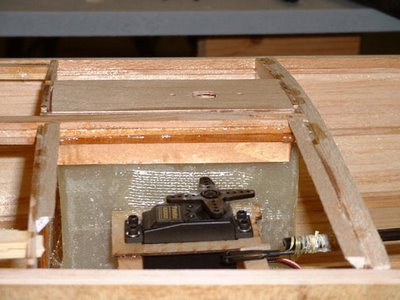
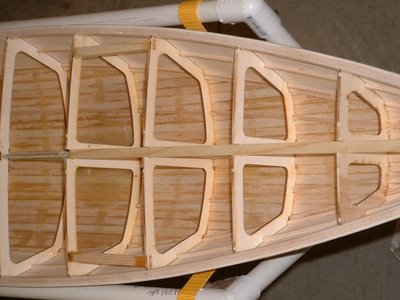
John Fisher is ready { 4/19/2007 } to glass his latest boat and is sharing how he planked it. His dad built a ply sided, cedar planked star using titebond II and it came out pretty light and stiff. With this information I started to build another hull using the same materials. He felt that edge gluing the planks added a lot of the strength to his boat. John didn't want to glue in extra wood to hold the pins to keep the planks in place for the glue to dry, so I combined two methods of planking. John liked the quickness of planking with CA and kicker, but it lacked stiffness when sanding the bottom before glassing. So he decided to edge glue the planks and then tack them in place to the frames with CA.

In this photo you can see where John put drops of CA on the planks. The wood is slightly darker.


It worked well. John has an edge glued bottom and he was able to plank it in one evening. To do this John first spray the frames with kicker, then apply titebond III to the edge of the planks. He then would hold the plank in place, tight against the previous plank, and apply a drop of CA to each frame to hold it in place. It did not matter where John started, bow, stern, or middle, but do make sure the CA has set up before moving to the next frame. Once the whole plank was in place he came back and wiped off the extra titebond. To fair the bottom to the sides he used a $10, 6" plane from home depot set at .010" depth of cut. It quickly removed the cedar and a little sanding finished the job.

John had one plank that was too thin that he had to remove, it was harder than expected. He had the use quite a bit of force to break the glue joint at each frame, so he is confident that this method is strong. John will also use this for balsa planked bottoms.

In photo # 10 you can see the stern still needs to be trimmed and sanded. John will probably use a saw to trim in close and then sand to fair it.

Sailing Model, AMYA Star45 Class | interior work, radio, sail controls, servos, mast support

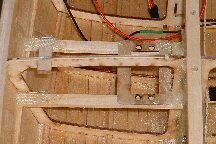
Radio Board stringers between bulkheads

(Note the method of keel support using these stringers)
radiobd_1sml.2.jpg


Radio Board
radiobd_2sml.1.jpg


Rudder Servo
servo_sml.2.jpg


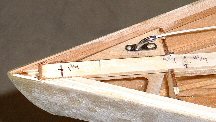
Mast support (inside hull)


internal mast support

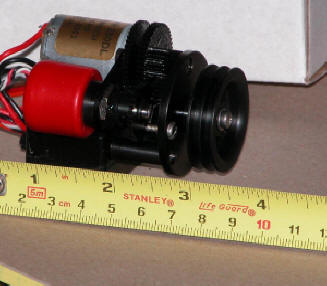
A Drum style model sail winch


photo's courtesy of "Larry Ludwig" at www.LudwigRCYachts.com, Ludwig Mfg.


==

From: "Stephen Pratt" :
"On the North Coast (Ohio), are using HiTec HS-725 or HS-785 Winches. Bob Luther developed a mechanism to work an endless loop system of sail control. Fits inside the Star 45 with plenty room to spare."

S45 Model Boat construction | Sail Control Units

installing the radio tray for an under deck winch, jib tweaker, and rudder servo. From John Fisher:


The radio tray is 1/16 ply backed up with 1/8 X 3/8 spruce or basswood. Note the glassing at the ends. This adds a lot of strength to the joint and John highly recommend adding it. John uses 1" wide glass tape cut in half, then sprayed with 3M77 so it will stay in place for gluing. Then a dab of your favorite epoxy and you are done.


sheet through deck mount.


jib tweaker turn around. The part is a 180 deg sheet lead from great basin.


See also http://woodstar45.blogspot.com/2006/10/blog-post_116031550255831231.html
--
From: David Ramos To: Star45@yahoogroups.com
Sent: Fri, 14 Nov 2008 10:23 am
The following photos show my set up for a drum servo and jib tweaker.

--
Note:
One major advantage of building from a fiberglass hull is the open space inside the hull. David Ramos offers workmanship second to none.

Dave Mainwaring
--
http://www.rcyachts.com/STAR45/P1010084.JPG


http://www.rcyachts.com/STAR45/P1010082.JPG


Main sheet is 2:1 and jib sheet is 1:1

Hope this helps
David Ramos
Chesapeake Performance Models
227 Main Street
Stevensville, MD 21666
david@rcyachts.com
www.rcyachts.com

Sailing Model, AMYA Star45 Class | Masts


3.1 Masts shall be made of wood or aluminum. Swing rigs, rotating and permanently bent masts are prohibited.

3.2 Masts shall not exceed 3/4 inches square when measured at the thickest point of the mast. Maximum mast height shall be 70" when measured from the deck, inclusive of the crane. Rotating wind indicators and burgee staffs are not included provided the backstay is not attached to them in order to circumvent the 70" maximum mast height specification.

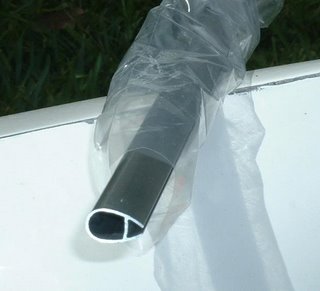
Typical Slotted Aluminum Masts for model sail boat


photo's courtesy of "Larry Ludwig" at www.LudwigRCYachts.com, Ludwig Mfg.

Sailing Model, AMYA Star45 Class | Booms

AMYA Star 45 Class Rules, 2006, Boom
4.0 BOOMS:

4.1 The main boom and jib club shall not exceed 5/8" when measured at the thickest point. Booms and jib clubs shall be constructed of wood, aluminum and/or fiberglass.

Sailing Model, AMYA Star45 Class | Construction Deck(s), Hatches

from John Fisher:
Attaching deck to hull

John Fisher photographer


Hull with deck mounted:

John Fisher photographer


--------------------

HATCHES:

From Phil Geren:
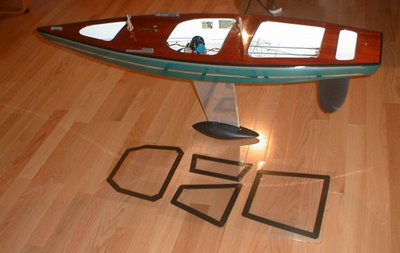
The simplest hatch cover solution I have found for Star 45 is to cut a piece out of Presentation Cover vinyl, which cut-out is shaped like the hatch opening but 1/4 or 3/8 of an inch larger on all sides. Then, apply electrician's tape (1/2 or 3/4" wide) all around the perifery, so that half the tape is on the vinyl and half is hanging over the edge.

Presentation Cover vinyl which I get at Office Depot is about 15 cents a sheet; it is about 0.008" thick; it is slightly over 8.5X11" in size; a full sheet weighs about 16 grams; it is stiff, but flexible; it is crystal clear, but if you want it opaque, just wet sand it with #400 grit wet or dry sandpaper.

Position the hatch cover over the hatch so that the tape extends evenly past the hatch opening an equal distance all around, and then just press on the tape to stick it to the deck. It's waterproof, durable.

You can make spares and stick them to another piece of vinyl and carry that with you to the races. That keeps spares nice and flat and keeps the tape's sticky side clean for future use. A set of these hatch covers usually lasts me all season. At lunch, I take one cover off to allow the boat to dry out, sticking the cover to a dry vinyl sheet to keep the tape's sticky side clean.

Photo is Star 45 #778, freshly rebuilt for the Nationals this year, and a set of covers on the floor next to her.


Phil Geren photographer


--
from Uncle Dave:
I pulled one of my old Star45's from the attic and have it here in my workshop. It has a fiberglass Sirius 45 hull, a aircraft ply deck and aluminum keel fin. Unfortunately it is not one of my finest examples of workmanship or painting. However I'll suffer the embarrassment and use if to show some one style of hatch construction.

Carrying around a model around out of the water is no big deal. Taking a model out of the water can be something else. You first need to hang onto the model. Then find a place to take hold to lift the model. This is one of the reasons I have used easily removable hatches. You can grab the model through the hatch, fingers under the deck and pick it up. Of course a thin ply deck the model deck and hatch construction needs to be strong enough to withstand pulling on the deck and lifting a twelve pound plus model. Therefore I braced my decks around hatch areas.

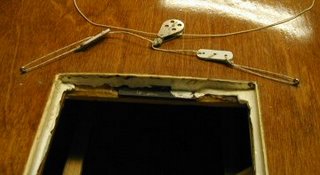
First I built a flanged frame for the hatch to sit in that also extended under the deck and attached to the deck bracing.
dlm_hatch_a.jpg

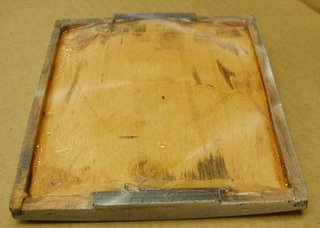
Then I built a hatch cover based on the size of the hatch. Initially the hatch cover was made to fit very loosely in the hatch. I then took some silicone (tub seal or similar) squeezed a bead around the shelf/lip of the hatch. The covering the hatch opening with food wrap poly sheeting I'd push the hatch cover in place down into the silicone. This made a nice water tight gasket around the edge of the hatch. After waiting a day I'd remove the plastic, trim and silicone that showed topside. With the silicone dry, pop the hatch cover in place and check the fit.

dlm_hatch_b.jpg

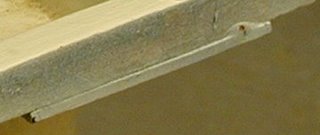
I placed a strip of magnetic tape on either end of the cover and on each end of the hatch frame.

dlm_hatch_c.jpg

When the hatch cover and hatch mag tapes touched they pulled together. This magnetic tape is neat stuff you can pop the cover in place and it will stay put.

Typically I made my hatches about 4"X5" giving me plenty of deck to the sheer.
fixed_travelersml.jpg

I heavy weather if the model might go over on beams end I'd cover the seams with tape just to be extra watertight. A 4X5 hatch gives room to get inside, adjust winch, radio etc, and to remove any water that got into the bilge while sailing.

S45 Construction Deck

4/19/2007 John Fisher just finished the deck rigging last night on his latest boat. The boat is set up pretty simple. Open loop with elastic. Winch is below deck, but the same rigging setup can be used with an on deck winch, just substitute a turning block for the through deck block.

The sheets go forward to a block on a bridle for the main sheet. The jib sheet and elastic go through a double block attached to the chain plate to keep things from rubbing on the mast, then through an adjustable double block forward. The jib sheet then goes back to a deck mounted block. The elastic is then hooked to a loop on deck. John put a hook in the elastic so he can release tension when in storage.

Chain plates and mast step are laid out per Scott Rowlands tuning guide.


In tweaker photo bellow you can see the tweaker servo and winch mount.

Sailing Model, AMYA Star45 Class | Decking

From Terry Forbes:
"The Star 45 boats that I have built have decks made from bass wood strips that are 1/4" X 1/16". I find them easy to use and easy to bend with out fracturing. I use thick ca to bond to hull frames and to the adjoining strip. When is have it all glued down, I sand with 120 grit and then 200. I use a soft rag to wipe off deck but leave the cracks filled with the sanding dust or "wood Flower" I then give it a thinned coat of slow cure epoxy. This first coat will soak into the wood completely. I then use un-thinned epoxy for the second and third coat, wet sanding and tack ragging between coats. If you want a really glassy deck, I use a finish coat of Captians Spar varnish. I have used this finish technique on full scale boats and all of my Kayaks. Very nice and durable finish. The decks go on easy and I try to stagger the strips one dark one light. I built a full scale star in the early 60's and had a striped planked deck. I like the look and it builds light. It keeps the hull true as sometimes when you add the deck using plywood it can cause it to move around. I will post some photos of my next hull as it comes to life. I have constructed a ships-way. I used the formers that are shown on the IMYA star plans. I now only have to cut the actual hull formers. I Stack cut 4 at a time on my trusty Dremmel Moto Shop Saw. I have added some lighting holes here and there. All in all I can have a hull lofted in 1 hr. and the sides on that evening using 20-min epoxy to coat the frames and the inside of the hull side. I first made my side peaces out of poster board. This allowed me to get the fit close and have a template to trace the sides for cutting. "

Woode boat Construction -- glues and adhesives

John F. Howard (Star-45 discussion forum, July 31, 2006)

"Gorilla Glue does foam a bit, but nothing like foam-in-a-can and has minimum stink. Forget trying to smooth things out, the foam is very, very sticky and keeps growing until it sets up (about an hour) at which point it will still be a little soft (keep clamped for 3-4 hours). Any squeeze/foam out once hard, can be cut, chiseled or sanded smooth. Run a strip of tape along the edge of the glue line and most of the foam out will end up on the tape. The best joints are tight ones that use a minimum of glue. For narrow or thin pieces (planking), squeeze out a little puddle (just enough to use in 15-20 minutes) and use a Popsicle stick to spread along the edges. Wear gloves, the stuff stains and is sticky. GG is great for laminating larger areas (spread with an old credit card or playing card)."

"If you use epoxy resin such as West Systems (best, you can adjust the cure rate with the different hardeners) or one of the 30-minute or longer (5-15 minute never gets hard and remains rubbery) such as sold by Great Planes or Tower, stink will not be a problem. The polyester resin does STINK in a big way, it what you can smell in a new fiberglass hull.
CA glues are ok for "tacking" stuff in place until the epoxy sets up, but watch the fumes. CA will fail if used in a wet location for long and also cause a problem with the wood accepting stain. Work with plenty of ventilation and or respirator and wear gloves with any of the above glues and resins, staining of the skin and sensitivity, either skin and or breathing can occur."

"These are base on my experience with the glues mentioned (full size boats, cabinet work and models). Yellow glue such as Titebond or Elmers Carpenter Wood Glue (not waterproof) works fine when encapsulated with epoxy (cedar strip canoe builders use it all the time)."

{ http://groups.yahoo.com/group/Star45/ }

Phil Geren adds a warning note about Glue Fumes:
I have a serious allergic reaction to CA fumes - causes fluid to build up in the lungs, like pneumonia. I still use it, but with a fan blowing air between me and the work. Trying to avoid it.

Phil Geren on Gorilla Glue:2006 August 1
Is it rock hard or rubbery when dry?
I bought some, but have the same reservations as Dave M about foaming, trimming, and sanding. If it doesn't sand well, the finished product won't be as good as what I am aiming for.

Star 45 Setting Sail -- on-line "How To Sail" resources

From: "Don Keeney" <1keyknee@281.com>
Date: Sun, 19 Nov 2006 15:39:26 -0600
Subject: [Star45] Sail Trim

A great place to learn about sail trim and sailing in general.
http://www.sailingusa.info/sail_trim.htm

Don Keeney
Star 45 Class Secretary
--
Outstanding recommendation. Wonderful site. full of photographs and all sorts of instructional materials. Pictures of tells and how to read them:)

Another must place to visit (you can try out your sailing skills):
National Geographics Interactive Sailing:

Master rudder and sail to get your boat going as fast as possible no matter what direction you're sailing in-or which way the wind's blowing.

Controls available:

Sail Adjuster: Use the left sliding controller to rotate the sail in relation to shifting wind (shown as arrows). When you cross the path of the wind, your sail will swing to the opposite side.

Rudder Adjuster: Using the right sliding controller, steer to port (left) or starboard (right).


Uncle Dave

modern sail materials, North Cloth - Industrial Fibers

by Peter Mahr and Brian Doyle
http://na.northsails.com/North_Cloth/industrial_fibers.html

Almost every piece of modern sailcloth begins life as an industrial fiber. While the brand names of many of these fibers are well known to sailors, their basic properties are less well understood. The characteristics of these fibers are an important factor to consider when choosing sails for your boat. Over the past few years there have been some significant developments in high performance fibers that have applications in sailcloth. The result is a greater variety of options for performance sailcloth makers and their customers, allowing them to select the blend of performance, durability and cost that best suits their needs.

Polyester
Polyester is today's "classic" sailcloth fiber. It is often called by the Dupont trade name DACRON® although there are other suppliers of polyester yarn used in sailcloth. Polyester is widely used for its combination of reasonably low stretch, good strength, low cost and durability. Because it can be heated and shrunk during weaving to form a tight, stable woven cloth, polyester woven sailcloth remains a good choice for cruising sails and certain racing sails. Polyester is available in many types. Dupont’s Type 52 is a "high-tenacity" premium fiber offering a balance of higher strength, lower stretch and maximum shrinkage. Other premium polyesters, with comparably excellent properties at more attractive prices, are now available from Asian and European suppliers. Their use in sailcloth has increased over the last few years at the expense of Dacron.

Nylon
Nylon is used for most downwind sails because it is strong and light. Nylon is relatively stretchy, allowing it to absorb shock loads and making it easier to fly and more stable in wavy seas than a polyester material would be. Dying this fiber is easier than any other and it is often available in a variety of colors.

Aramids
A popular class of high performance fiber in laminated sailcloth is the Aramids. The most well known aramids are Kevlar™ (a Dupont trademark) and Twaron™ (made by Teijin/Twaron of Japan). Sails made with aramid fiber are lighter than woven Dacron or Polyester laminates, and have greater effective wind ranges. The tradeoff is higher cost and shorter sail life. The stiffer Aramid fiber is more susceptible to sunlight (UV) damage and breakdown due to folding and flogging.

Aramids are produced in a number of different styles, with different balances of stretch, flex strength, weight and cost. High modulus (low stretch) types such as Kevlar 49 and Twaron 2200 are the most appropriate choice for racing sails. A variation of Kevlar called “Edge” was promoted a couple of years ago because it had slightly higher initial modulus. North’s testing revealed that this effect disappeared almost immediately with use. This type has since been discontinued.

Another aramid fiber is Technora, which is similar to medium modulus Kevlar in chemistry and performance. Initially it has a bit higher strength but loses strength more rapidly in UV making it similar in durability in most applications. It is commonly seen with a black coating, which is intended to provide some UV screening.

Vectran
Vectran is a LCP (liquid crystal polymer) fiber sold by Hoechst. Vectran’s stretch resistance is nearly as high as a standard modulus aramid, and it is somewhat stronger when new. It differs from aramids in its chemistry and has somewhat better flex resistance as long as it is shielded well from UV. Under UV exposure, it degrades more rapidly than aramids and far faster than Spectra/Dyneema.

Carbon Fiber
First used successfully in the 1992 America's Cup, carbon fiber laminates provide exceptionally low stretch and light weight at the expense of higher cost and somewhat shorter life span compared to an aramid sail. Careful R+D and on the water testing is critical with this fiber. Carbon is available in a wide variety of types, only a few of which can tolerate the flexing seen in normal sail use. Laminating techniques are also very critical to get the available high performance as well as to achieve the best possible durability. Experience over that last few years on top boats with 3DL carbon and carbon/aramid sails has been very positive and the fiber is seeing increasing use by more types of boats.

Spectra/Dyneema*
Spectra, and its European counterpart Dyneema, offer even lower stretch, higher strength, better UV resistance and much less strength loss in flex than Kevlar. However, Spectra/Dyneema sails stretch (creep) under long-term load, which makes them unacceptable for racing sails. After considerable development, this fiber is now used with excellent results in sails for large performance cruising boats.

* Note: We use the somewhat awkward ‘Spectra/Dyneema’ reference since we employ the two fibers almost interchangeably and sometimes in the same piece of cloth

PBO
At the top of the theoretical performance list is PBO, a fiber made by Japanese company Toyobo. This fiber has been used for a number of years in both 3DL and paneled sails. It has proven to be somewhat better than an aramid sail in performance when new but degrades rapidly under the combination of UV and flex. Because it is a very expensive fiber, its use in sails has all but disappeared in favor of the even higher performance and more durable carbon option.

PEN
PEN is a fiber with stretch between polyester and aramid and with slightly higher strength than polyester but far less than aramid. That combination and a cost approaching aramid have meant that this fiber has limited application in sails. It has been ruled to be polyester and as such can be used in one-design classes that limit their sails to polyester.

Summary
New fibers continue to come out of the labs. Some will become standards while others will disappear. Despite the promise of these exciting new fibers, design still plays a vital part in their successful application in your sails. Simply inserting a spicy new fiber in a poorly engineered fabric or sail design is a formula for failure. Similarly, enough of the fiber must be used to handle the sailing loads and the abuse it will take in tacking, flogging and handling. Low stretch has always been desirable in selecting fibers for sailcloth but this is only one element in a sail's performance. It is ultimately the combination of fiber, fabric and sail design that makes for a winning sail.

Fortunately for North our 3DL molded sailmaking process allows us to produce a test sail from a new fiber within a few days of its arrival at our factory in Nevada. This has allowed us to quickly evaluate new offerings and to remain the industry’s technological leader.